Monday, August 30, 2010

Swamp shack tutorial

 
A swamp shack is a great backdrop and focal point for multiple event areas including bar and game areas.  My shack had to be shipped to the event site, so was created with transportation ease in mind. Here's the tutorial on how I made it.

The framework base was made from 1/2" PVC pipe I spray painted black.  Painting was an extra step that is not 100% needed, but for this application I wanted to make sure that if they were visible through the cover materials they wouldn't stand out.  PVC pipe is available from any home center, however I had to order several of the specialty fittings with 4 and 5 openings online.  To increase stability, after this photo was taken I cut the verticals supporting the "building" in two and added horizontal cross pieces to the middle.  I left the two verticals "as is" for the open porch area.


The roof was vacuformed plastic shingles from Sketch-Lite, a theater prop supplier.  It comes white so I first painted it a dark brown and then went in with lighter brown, grey, yellow and green to highlight areas where natural weathering and growth would occur.  The faux painting and aging should not be subtle, it needs to be heavy in order to show up under the darker specialty lighting of the event.  The plastic can then be trimmed and cut to size with heavy scissors or a utility knife.


I attached the roof with wide hook and loop tape. This allowed for easy assembly onsite.  The shack sign was carved from foam and also mounted with tape (look for my tutorial on foam signs).  The sponsor, guest of honor's name, or other fun store name would all be appropriate to highlight here.


The same paint technique was also used on the shack door which was carved from pink foam and white styrofoam. 


The door was created in two pieces for easier transport.  Skewers were used to attach the top and bottom on site.


The porch posts were actually giant size pool noodles, painted and aged in the same color as the roof and door.  They just slipped over the pvc (they come with a hole that runs up the middle).


The porch flooring was a simple roll up garden walkway that I stained and aged.  I designed the pvc structure to fit the width of these planks.

The window was a carved piece of foam painted to match and then backed with metallic paper for the "glass".


Once on-site I assembled the pvc framework and then wrapped it in corrugated paper with a weathered wood print from Stumps prom & party supplier.  I then attached the roof with hook and loop tape and attached the window and door with tape and fishing wire.

Palms, ferns and amaranthus sprouted from around the shack providing great texture and color to set off the structure.  Finishing touches included a flickering lantern, wood buckets, plastic spiders, frogs, and geckos.  Fishing poles with carved fish dangling from them leaned against the porch posts. 

In front I added black wood rocking chairs where guests could sit,  chalk boards which listed the prizes and how to play the treasure chest game, and finally shipping crates (made from foam) and real whiskey barrels for drinks and food.


Wednesday, August 25, 2010

Gambrel's back!?!?

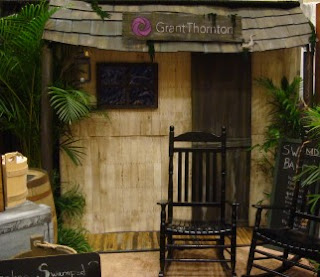
On my walk tonight I saw 3 high-end homes being constructed with gambrel roofs (a gambrel roof is shown in the example above).  Is this look back in fashion?  While not my favorite style it has an old barn/farmhouse style that has become popular in order to make 4,000+ sq ft homes look like they fit in an existing neighborhood.  We've gone through a wave of craftsman style, now it appears builders are looking for something slightly different. 


Is this a trend in your area as well?

Tuesday, August 24, 2010

Real Party: Bayou Bash

Come on down to the bayou and prepare to party!


This Bayou Bash for 150 international guests was hosted at a Miami hotel.  However as with most hotel ballrooms, it was bland and sterile.  The goal was to create an atmosphere that would encourage attendees to interact and provide a format for conversation after sitting in sessions all day.


Planning this event presented some unique challenges.  The room originally allocated was not big enough to accommodate the 150 guests.  In order to capitalize on this "defect" I incorporated the hallway outside the room into the overall event space.  It was staged to give the entrance definition.  Guests were brought in through the swamp (complete with Florida wildlife, including flamingos and an alligator) which in turn transitioned to a shadowy dock area where the first bar was located.  Then the party opened onto the beach with treasure chest and ship's mast in the ballroom space with entertainment and buffets. 

Move-in was limited to 3 hours so many of the items were staged in an adjoining room and moved out at party time.  All items were shipped to the site and assembled.  Decor budget was under $1,000 for all three spaces.

I carved the welcome sign from pink insulation foam and painted it to match the theme.  Look for my post on the how-to's.


Multiple types of palms and landscape plants were purchased from a local farm which was very cost effective.  The blue and green lighting made the theme come to life and set the mood in each of the sections.

The stream with waterfall, bridge and resident alligator was a favorite conversation point for attendees.  The next day they even named the alligator during one of the education sessions!
The faux grass and metallic paper stream were from Stumps.


Dock pilings were constructed in various sizes with corrugated wood-grain paper from Shindigz/Stumps and wrapped with rope.  I used a hot glue gun to assemble all of these.  Bars were wrapped with the same paper.  


Faux flame tiki torches from Tiki Zone gave a lively touch to the bars.


Real whiskey barrels with natural patina coordinated with carved foam shipping crates.  This also served as the station for the game to open the lock on the treasure chest.


A swamp shack was created from a base of PVC pipe, corrugated wood paper, molded plastic roof and carved foam.  Tutorial to be posted separately.  Additional elements were added to increase the charm, including rubber spiders, frogs, and geckos.


The hallway was lined with anchors and burlap bags which were used coffee bags stuffed with pillows.


Once in the ballroom the lighting transitioned from the cool and shadowy green and blue of the docks to warm orange and yellow.


The buffet centerpiece was a wood treasure chest overflowing with pearl necklaces, giant gems, "gold" coins, and jewelry.

Fishing nets, shells and flickering candles adorned the cocktail tables.


A wall mural of a beach with the setting sun over the ocean (Stumps) served as the backdrop for the live music.  The second bar was backed by a giant mast made from PVC pipe, rope, a painted plastic bucket and fabric.  One logo was projected onto the sail and I used an iron-on transfer sheet to customize the flag at the top of the mast with another logo.


Favors included custom imprinted gold chocolate coins from RockStar Promotions and gem rings.

Thursday, August 12, 2010

Circus How-to's

Creating the pieces to the Vintage Circus was laborious, but worth sweating all of the details for the final product.  This theme can translate from a corporate event to a birthday party or even a fun wedding! 
The first item I made was the ticket booth.  A friend and I built this in about 5 hours including the trip for the lumber.  Mine had to be shipped to the event site, so was made to completely break down into small sections and be screwed together.  I drew up the simple plans on grid paper and estimated the dimensions by measuring things around the house that I thought would be the right size.  For example the height of the counter is a little higher than my kitchen counters and the height of the bottom of the upper sign is just a little taller than I am.


Painting took much longer.  Over two weekends I primed, basecoated and then striped.  I used Kilz primer and then Valspar Signature Laura Ashley colors in Bleached Wheat LA208 and Violet Smoke W41005A.


Painting the logo sign took another weekend as it's humid here and the paint took a long time to cure before I could tape more stripes.  The base of this sign is pink foam.  I added silver and green acrylic paint from Michael's to add some pizzaz to the purple and antique white color scheme.


The lettering was done on the computer and then printed onto sticky vinyl by my local printer. 

Lights were custom cut to fit the # of holes I had by Novelty Lights.  They are G50 size and poked right through the holes I made.  I taped the wires to the back with matching duct tape.  For shipping they needed to be easily removed but you could secure yours more permanently if desired.

The theater section is made from pre-made velvet panels from Curtainworks.  I made the striped fabric panels from a Waverly print I found at Denver Fabrics by hemming the bottom and making a simple rod pocket at the top.  I didn't hem the sides as they didn't show behind the velvet. 


The trims were from my local GStreet fabrics.

The wide purple striped background is a custom print designed by Mary Petitt and printed by my local large-format printer, C2.  They finished it with a rod pocket at the top.  Mary also designed the Pick-a-penny poster which was printed on sticky vinyl and then adhered to the background.

The HiStriker was painted a custom color combo and the face of the game was again designed by Mary Petitt in our colors and vintage lettering.  I wrapped the handle of the maul in purple gaffer's tape to match.  This game at 10' tall was a Jr version of the midway version.  We also set it to the "easiest" setting so that more guests would win.  However it was REALLY hard!!!  Most female attendees and many of the males were not able to ring the bell.

The penny press was built for us with our custom die.  We incorporated the circus theme and then added the event date and occasion.  Many guests had never seen a penny press and some thought it was magic!


The flooring was roll vinyl in a bamboo print.  It's meant to resemble hay that would be on the floor at a circus.  It was padded and cushioned our feet and the histriker.

For safety in our small space I added rope and stanchion in purple velvet and brushed nickel.  This prevented guests from accidentaly getting hit by a flying maul.


Tuesday, August 10, 2010

Vintage Circus

No clowns here, but a whole lotta fun!
This vintage circus theme was classy and exciting all in one.  I custom designed all of the elements to fit the event, using themed colors and styles, but you could replicate these ideas with existing rental pieces.

First: guests came to the Ticket Booth for their try at the "Pick-a-penny" game. 


Picked pennies then went into the penny press where they were stamped with the event logo and date for permanent souvenirs. 


Afterwards guests could try their hand at the custom themed HiStriker.  Are you "Shaky" or a "Winner!"?


The theater held many secrets...


Attendants finished off the theme by dressing in coordinating outfits.


Construction details in blog to follow, but sources are:

Paint: Valspar Signature- Laura Ashley Bleached Wheat LA208 and Violet Smoke W41005A
Lights: NoveltyLights
Theater drapery: Purple velvet- Curtainworks
Stripe- DenverFabrics

Thursday, August 5, 2010

On-site satchel

You're on-site, time is ticking, people are scurrying and you're trying to do 5 things at once.  What is your best companion?  Your on-site box/bag/satchel filled with all of the utensils you need to complete your installation quickly.

I was given a fantastic new bag in Orlando by my destination management company, Kuoni, that had all of the essentials.  The bag is from Swiss Army and is the perfect size to fit everything you need, but in a small enough package that can be easily worn and carried.

What's inside?

  • Kleenex
  • Binder clips (various sizes)
  • Wet ones
  • 1st aid to go
  • Post-its
  • Pain reliever
  • Emery Board
  • Mints
  • 12' tape measure
  • Rubber bands
  • Sharpie
  • Mechanical pencil
  • Pen
  • Mr 7 hands (this tool is fantastic and available at Target)
  • Lip balm
  • T-pins
  • Hand sanitizer
Do you have a fabulous way to stay organized on-site?  Any favorite tools?

Tuesday, August 3, 2010

Office Makeover

I recently gave my office (AKA crafty room) a makeover and am so pleased with the results!  Now lest you think I got energized out of the blue, I was actually forced to re-arrange the room because of new hardwood flooring that was installed.  Just removing everything was a daunting task! 

Once the new floor was in, I couldn't just pile everything back in willy nilly.  So I went on a massive IKEA run (well, more like 1 run a day for 3 days).  The final result is: BILLY bookcases for my brochures, magazines and books, EXPEDIT storage units with doors and boxes, and ALEX drawer units.  For future ease of moving and re-arranging I put casters under all of the pieces except for the Billy bookcases.


The drawer units are exactly what I'd been looking for.  They are shallow and on slides so I can label them and sort my many tools and tidbits.

Once everything had a place I was pleased, but wasn't quite content.  I needed to spruce the room up!  Since this was such a small space I wanted to make the decor distinct from the rest of the house.  The black IKEA cabinets started off my color scheme and then I found a black and white tablecloth I loved at HomeGoods.  I made a valance for the window (and matching apron!) with the tablecloth fabric and made a cork board from a frame I had.


So now I'm energized to use my room again and can't wait to start a new project!

What are your secrets to staying organized in your workspace?
Related Posts Plugin for WordPress, Blogger...